Adding a Category
You can think of a category as a container for subcategories. Because content items can only be assigned to subcategories, each top-level category you create must contain at least one subcategory before it is useful for categorizing content.
Add a Category
- Click Settings & Tools > Content Setup, and then click Categories.
- Click New, and then click New Category.
- On the Edit Category tab, do the following:
- For Name, type a name for the category. This name must be unique across all sites.
- For Reference ID, the field auto-fills with the category name. You can change the reference ID but be aware that it must be unique.
- For Category Owner, select a user name. This is someone assigned to manage this category (to add and maintain subcategories). (See Assigning System Permissions for details on assigning a user as a category owner.)
Note: Category owners have access to all content associated with owned categories.
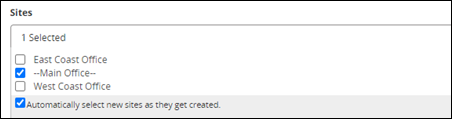
- For Sites, select the sites that will offer this category as an assignment option in templates and content items. You may also want to select Automatically select new sites as they get created.
- For Selection Type, select Single to allow owners to choose one subcategory under this new category, or select Multiple to allow owners to choose as many subcategories as desired for this category.
- For Constraints, to allow owners and proxy authors to add subcategories to the new category, select Owner can add subcategories. If you do not want to show the new category in the Arrange by option when using Browse, select Hide this category in Browse.
- For Description, type a description to explain what the category is for and the type of subcategories it should contain using the formatting options available in the rich text editor toolbar.
- On the Compliance tab, select the check box Send document metadata to Risk Management system.
-
This option allows approved content and related metadata to be shared with a linked IRM system and sends updates on that content to those same systems.
Important: The Resend Data button is for troubleshooting purposes only. Avoid selecting to ensure system accuracy and efficiency.
- Click Save.
This publication was written and produced at NAVEX Global, Inc., Lake Oswego, Oregon. This publication or any portion thereof is confidential and/or proprietary and may not be reproduced or used in any manner whatsoever without the express written permission of NAVEX Global, Inc.
Copyright © 2026 NAVEX Global, Inc. NAVEX Global® is a registered trademark/service mark of NAVEX Global, Inc. The NAVEX Global® logo is a trademark/service mark of NAVEX Global, Inc. Unauthorized use of NAVEX Global, Inc.’s trademarks/service marks is strictly prohibited without prior written permission from NAVEX Global, Inc.